
Note: the frame sizes and frame rates given here pertain to the NTSC broadcast standard in use in the United States. The other international broadcast standards such as SECAM and the various PAL standards differ from NTSC in these respects, but the same principles apply.
Why videotape rocket launches?
First of all, because it makes really cool images.
Second, it allows you to do some science. Videotaping rocket launches allows you to observe specific parts of the thrust phase and even to determine how fast the rocket is going at different moments in time. Velocity data can be obtained, for example, if you can measure the distance travelled by the rocket between two video frames in your recording. Unfortunately, consumer-level (i.e. affordable) video cameras only capture 30 frames per second (29.97 fps to be exact, but we’ll round that off). If the rocket’s thrust phase only lasts 0.1 second, and you are only several meters away from the launcher, then you can capture only 3 frames with the rocket in motion. What’s worse, the rocket images may be blurry in those 3 frames. Is there any way to improve this?
My videotaping tips
- Most consumer-level video cameras have autoexposure settings for different situations such as sports, indoor shots, or extreme low light. Choose the sports setting, if you have it. And make sure there is plenty of ambient light. This will ensure that the camera uses the maximum 30 fps and will also minimize the gate time or shutter speed (the amount of time that the camera captures light during a given frame). This will reduce the blurring.
- Try to have a dark and uniform background in your video shots. As you can tell in the example images I give below, it is much easier to distinguish details about the rocket and its exhaust when the background is dark and uniform.
- Tilt the camera sideways so that the larger picture dimension is in the direction of the motion. This gives you at least 1/3 more pixels in the larger picture dimension, and hence, more ability to resolve details and distances. (If you capture your images to computer you can rotate them back to an upright position with software.) Note that there is one exception to this bit of advice on tilting the camera: don’t do it if your subject (the rocket) has about the same luminance (same gray-scale value) as the background. In order to conserve bandwidth, the NTSC standard provides for much less color resolution than it does luminance resolution in the larger picture dimension. This means that colors get smeared out in this direction and that your subject will be less distinguishable from the background.
- If you have a decent video capture card on your computer, you can actually double your speed to 60 frames per second. “What?” you say. This works off the principle of video field interlacing. You must have a decent capture card because it needs to be able to capture every scan line (e.g. 640x480 pixels) at 30 fps for this to work. More about this below...
Getting 60 fps from your video camera
The information below was written for analog video cameras. Current digital video cameras have two modes for capturing frames: interlaced and progressive. The information below applies to the interlaced mode.
The video camera actually records 60 fields per second. A field is composed of the data from every other line of pixels from what the camera CCD chip sees. Two adjacent fields are composed of complementary lines so that fields together constitute a complete frame. Each field contains 240 lines. If a computer capture card captures at 320x240 pixels, it is common for one of the fields to be discarded entirely—there is no way to recover this lost information. However, if the capture card captures at 640x480 pixels, then it combines the two fields to generate one interlaced frame before it is stored on your computer. This is illustrated here:
 +
+
 =
=

The problem (or the advantage, in our case) is that the two fields are captured 1/60 second apart. This means that an interlaced frame will contain two images of the rocket, separated by 1/60 second. For instance, if the circle in the above frame is travelling rapidly you will get artifacts in your frame such as
 or
or 
because in each case the circle has moved between the times when the two fields were recorded. These aberrant interlaced frames still contain all the information from two fields, so the question is “How do you extract the two fields from the frame?” A particularly elegant solution requires that you first
Download the freeware program VirtualDub
This is a wonderful program you will want to have anyway if you make movies on your Windows PC. The program includes a great help file (and also there is more on the website) which is where I learned how to do what is described here. This program has lots of filters for cropping, smoothing, rotating, resizing, and making other changes to your AVI files.
For my method to work, you must capture video with at least 480 lines of resolution (e.g. 640x480) at 30 fps. In addition, you must capture the video using an MJPEG codec. A “codec” is a piece of software that tells the computer how to compress or decompress a video or audio file. I do not know of any MJPEG codecs that are free of charge at the present time. It is common for one to be included in the software that comes with a video capture card. I am quite happy with a codec from PICVideo I use, which used to be free and now costs US$28. LEAD charges only US$9.95 for their MJPEG codec. Both companies offer free trial versions that place a watermark on the video. The reason that MJPEG codecs are essential for this technique is that they store the fields as separate JPEG images when you capture 480 or more scanlines.
Next, import your MJPEG-encoded AVI file into VirtualDub, selecting “extended open options” and then an option to de-interlace the fields and double the framerate. The resulting AVI will be 60 fps but only 240 pixels high. Use the “smartbob” filter in VirtualDub to resize the frames back to 640x480 and to correct a half-pixel vertical jitter that would otherwise result. Other filters can be used to resize and crop the movie as desired.
Two examples
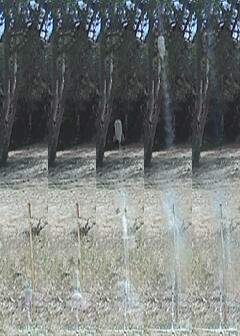
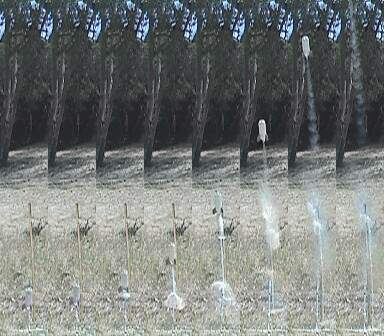
I videotaped two rocket launches. Compare below the sets of captured frames. In the normal 30fps sets you can see two images of the rocket on each frame, due to the interlaced fields. The corrected 60fps sets use the method discussed here. Numerical details for each launch are given at the end.
Launch 1, 30 fps:
Launch 1, 60 fps:
Launch 2, 30 fps:

Launch 2, 60 fps:
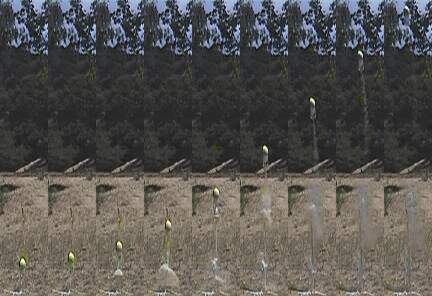
Clearly the 60-fps sets are superior. In fact, the adjacent pictures make a pretty good graph of position vs. time. I placed a tall wooden rod next to the launcher as a length gauge. Yes, that is a foam football (hollowed out) on top of the second rocket. Here are the data on the two launches:
| Launch | 1 | 2 |
| Rocket volume | 2100 mL | 2100 mL |
| Rocket mass | 132 g | 182 g |
| Water volume | 422 mL | 526 mL |
| Pressure | 88 psi | 88 psi |
| Launch tube | 25 cm | 25 cm |
| Length scale | 72 pixels/m | 48 pixels/m |
| Final velocity | 68 m/s | 57 m/s |
Incidentally, my water rocket simulator predicts the final (burnout) velocities of these two launches within a couple percent.