
Taking pinewood derby up a notch
The pinewood derby is a popular wooden-car racing activity for Cub Scouts (a program for younger boys in Boy Scouts of America). Generations of boys have learned sportsmanship and a sense of accomplishment while watching their fathers perform painstaking wheel-alignment, weight-balance, lubrication, and aerodynamic adjustments to the small wooden cars.
Some PWD cars I have made with my children can be viewed here.
In March 2004 the Elders Quorum (a men’s group) at my brother-in-law’s LDS church congregation held an unofficial “eXtreme” pinewood derby for the men and their families. My brother-in-law invited me to join the good-natured competition. I accepted. In this pinewood derby, nearly all the time-honored racing rules were eliminated. The only rules were:
- No open flames.
- No human physical contact with the cars while they are on the track.
![]()
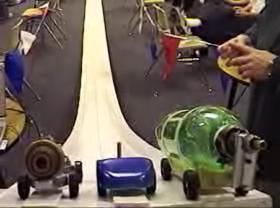
OK, fast forward to this year. Being preoccupied, I didn’t take any pictures or video on race day, so you’ll just have to trust me that there was an amazing display of creativity. I saw a car that weighed at least 5 pounds, one with six wheels, one that was half the normal length, and a number of electric-motor-powered cars. The electric cars each had a snap-action switch on the front that would break the electric circuit while the car was resting against the track’s starting gate (the gate is actually a vertical post). Three-wheel designs were popular, with one large rubber tire on the rear that would run on top of the raised center strip that guides the cars down each lane of the track. One electric car had a microcontroller onboard and a strip of LEDs that lit up in sequence, a nostalgic nod to the TV show “Knight Rider.”
These cars performed admirably, but didn’t come close to beating my car powered by water-rocket technology. My best time on a 16-meter (approximately) track was 1.5 seconds. The next best time, by an electric car, was 2.2 seconds.
Building a self-launching rocket car
Obviously my design would involve the release of compressed gas through a nozzle. While it would have provided phenomenal thrust force, I decided against using water as a reaction mass—I didn't want water spewing all over people and track. With only gas power to work with, I basically had a car like those CO2-powered dragsters (another educational car race for youth). Except that, according to rule #2, I could not manually open a valve or puncture a diaphram to release the pressurized gas. Thus, the most challenging aspect of the design was getting a high-pressure valve on the car to open when the starting gate dropped. This is essentially a “mousetrap” problem: getting a very slight force to trigger a very substantial force. My design solution was not unlike a mousetrap.
The car is built around a 710 mL 7-up bottle and a high-pressure 1/8-inch-NPT ball valve (US$20 at the local paintball store). The pinewood derby kit provides a block of wood and the wheels and axles. I shaped this block and added a bit of additional wood at the front of the car to better accomodate the bottle. The car weighs 179 g (6.3 oz). I typically pressurized the bottle to 8.6 bar (125 psi).
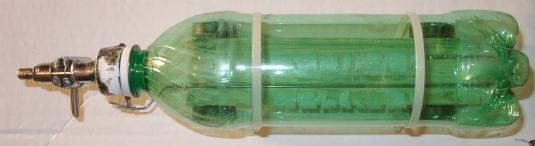
Side and top views of the complete car:
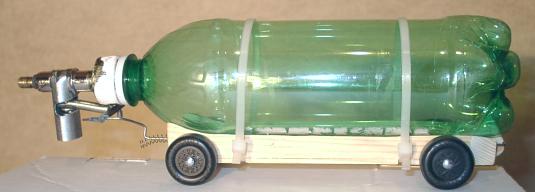
A bent piece of piano wire, running the length of the car, serves to transfer the slight force on the front bumper to the valve mechanism at the rear of the car. A small spring at the rear of the car gently pushes the piano wire forward when the bumper loses contact with the starting gate. This is the beginning of the triggering sequence.
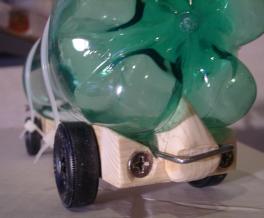
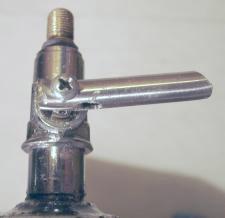
The front bumper:
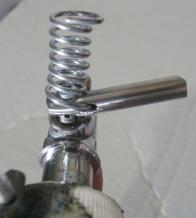
Close-ups from the side and bottom of the on-off valve
mechanism.
Here the mechanism is “cocked,” meaning the valve is closed:
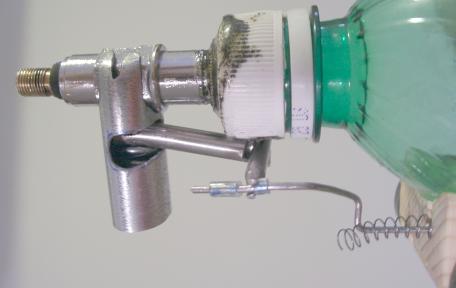

The red arrows show the triggering sequence. The small spring pulls the piano wire in the direction of arrow 1 when the starting gate is dropped. The two small pieces of vinyl tubing (marked with blue ink) near the end of the piano wire can be moved to adjust the sensitivity of the trigger. A section of 1/2-inch electrical conduit, partially flattened, serves as the cover over the valve-spring assembly.
Video of the triggering sequence:
Click on the above image to play the 224KB DivX-encoded AVI file.
To construct the end of the nozzle, I removed the core from a Shraeder (bicycle tire) valve stem, partially filled the stem with epoxy, and machined out a small 1-mm diameter hole. The stem is then fitted into the female threads on the ball valve. It is important that the most constricted part of the gas path be right at the exit in order to maximize thrust. With the ball valve open, and a very small exit diameter, this is the case.
Rear and front views of valve mechanism.

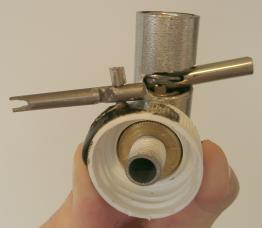
The valve itself is attached to the bottle cap using a stubby piece of threaded lamp rod, threaded washers, and teflon tape. This is followed up with epoxy on the outside of the cap. It turns out that threaded lamp rod mates well with 1/8-inch NPT threads and is fairly lightweight.
Pictures of the valve-spring assembly without the cover:
The cover provides a stationary point that prevents the top of the spring from rotating; the bottom of the spring moves with the lever arm. A relatively strong spring is required to rotate the lever arm and open the valve.
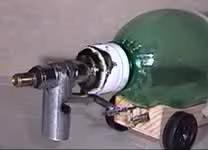
Rocket car in action
I did take videos of the rocket car, later, as an exhibition at a traditional Cub Scout pinewood derby. The rocket car cleared the finish line in less than half the time of traditional pinewood derby cars. The attendees, including my son, seemed to enjoy the spectacle.
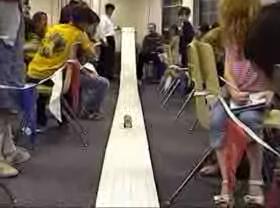
Click on the above images to play the 454KB and 384KB DivX-encoded AVI files. If the movies play with audio but not video, then you need to install the DivX codec as described on my links page.
Frequently Asked Questions
Q: Will you sell your car to me so that I may crush the competition at my local no-holds-barred pinewood derby?
A: No.
Q: Will you rent your car to me?
A: No.
Q: Please?
A: No. I spent about 40 hours planning, building, and testing my car. It is not a single-weekend project. I am quite fond of it. If I had to name it, I would name it Rosebud. Besides, I wouldn't want to deprive anyone of the satisfaction of developing their own pinewood derby technology.
Q: Can I see the car?
A: Sure. If you are in the Orem, Utah, USA area and would like to come see it demonstrated you are welcome to contact me.
Q: Do you have a set of blueprints, bill of materials, etc. for the car?
A: No. There is quite a bit of information contained on this page. It is intended to inspire you and give you ideas of possibilities. More or less, you need to figure things out as best you can, though I am willing to answer specific questions. You don't have to be an engineer to build a car like this, you simply have to be willing to tinker and experiment.
Q: Where did you get the valve used in the car?
A: I bought it at my local paintball store. It is known as an 1/8-inch on-off valve. An online source of paintball-related hardware that I like is Palmer's Pursuit Shop (look under "air fittings" for the valve).
Q: Do I have to use CO2?
A: No. Pressurized air from a bicycle pump works just fine. CO2 gives a slight performance boost due to it being a heavier gas than air.
Q: How much pressure do you use?
A: About 125 psi. A small pristine soda bottle can safely handle this amount in my experience.